3.6. TIME SYNCHRONIZATIONThe following paragraphs describe in detail the requirements and procedures to perform the Model 2100 timing synchronization functions. 3.6.1. UTC SynchronizationTo synchronize the Model 2100 with UTC, the requirements are as follows:
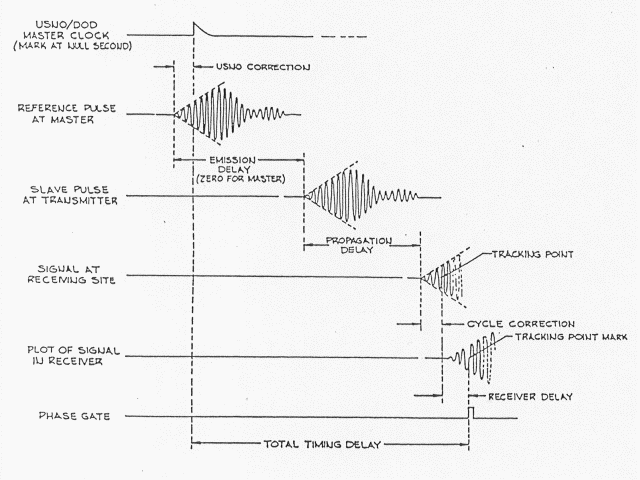
The first requirement (a) is satisfied by following the instructions in the Acquisition and Track section. The remaining requirements are discussed in the following paragraphs, along with a description of loran C timing. The loran C system is made up of chains of transmitters, consisting of one master and two or more secondary stations. Each station transmits a group of eight pulses, spaced 1 ms apart, with a carrier frequency of 100 kHz. The time interval between successive transmissions of the pulse group from a station is called the GRI and is the same for all stations in a particular chain. Different chains have different GRIs to minimize interference and to permit identification of the chain. Within a chain the order of pulse group transmissions is master first, followed by each of the secondaries. To prevent the overlap of two pulse groups from stations with the same GRI, time delays are introduced between the transmission of the master and the transmission of each of the secondaries. The order of transmission for each of the current loran C chains is shown in Table A-1 in the appendix. 3.6.1.1. Total Timing DelayTiming, using loran C, is accomplished by synchronizing the receiver 1 pps to the tracking point of the RF, during the
GRI that is coincident with a UTC second. The normal tracking point is the zero crossing at the end of the third cycle of the
100 kHz carrier, of the first pulse in the group. The resulting 1 pps is related to UTC and differs from UTC by the Total Timing
Delay (TTD). The Total Timing Delay is the sum of the following 3.6.1.2. Antenna Coupler DelayThis time delay includes the delay through the antenna coupler and the antenna lead-in cable. It is usually on the order of 10 µs for the AUSTRON Model 2026W Whip Antenna. This delay is not shown in Dwg. No.12491227, but it must be included if timing to better than 10 µs is required. 3.6.1.3. Receiver DelayThe receiver delay is composed of amplifier delays and the delay through the 40 kHz bandpass filter. It is measured at the factory and recorded on a label attached to the plastic pull tab on the 1st RF Amplifier PCB. 3.6.1.4. Cycle CorrectionA UTC second at a time-of-coincidence is related to the start of the loran C pulse. Therefore, you must account for the cycle of the 100 kHz carrier being tracked. since the Model 2100 tracks the end of the third cycle, a correction of 30 µs must be made. If any other cycle is being tracked, a correction equal to the number of cycles times 10 per cycle (number of cycles X 10 µs) should be used. 3.6.1.5. Propagation DelayThe propagation delay is the time required for the loran C to travel from the transmitter to the receiver. This is the hardest correction to estimate because the propagation speed of the loran C signal varies significantly as it passes over different surfaces (sea water, fresh water, dry soil, marshes, mountains, etc.). An average propagation speed of 3.3413805 X 10⁻⁶ second/kM can be used. This average speed in most cases gives an estimated delay within +/- 5 µs of the correct value provided the distance from the transmitter is know to better than about 1/2 kilometer.
3.6.1.6. Total Emission DelayThe Total Emission Delay (TED) is the delay from the transmission of the master pulse group to the transmission of a secondary pulse group as shown in Table A-1. For the master, this delay is zero. 3.6.1.7. USNO CorrectionThe United States Naval Observatory Time Service Publication, Series 4 (Daily Phase Values and Time Differences) is issued weekly, listing the observed phase and/or time differences between loran C stations and the USNO master clock, UTC (USNO, MC). Refer to the appendix for information on this publication. Once the total timing delay is know, the slewable 1 pps in the Model 2100 can be moved earlier in time (with respect to the fixed 1 pps, which is synchronized to the loran C pulse and which will always occur after a UTC second) to produce an on-time 1 pps. Requirement b states that a coarsely set 1 pps is required to do a time synchronization. The general requirement is that the 1 pps must occur before the loran C pulse, which was emitted during the first GRI after a time-of-coincidence, arrives at the receiver site. That is, at a time-of-coincidence, the 1 pps must occur within one GRI before the arrival of the loran C pulse. An alternate approach for setting the coarse 1 pps is to set it so that it occurs within the 10 ms period ahead of UTC. If WWVB is being used, for example, synchronize the external 1 pps to the received WWVB tic, then advance it in time by the approximate propagation time from the WWVB transmitter. This will give a 1 pps which is close to UTC. To ensure that the 1 pps occurs ahead of UTC, advance it an additional 5 ms. By doing this the external 1 pps should occur before the loran C pulse arrives, even if the station tracked is a master. For a secondary, the setting of this pulse is less critical because no secondary will be transmitted less than 10,900 µs after a UTC second at a time-of-coincidence. Once a suitable 1 pps is obtained, connect it to the EXT 1 pps input on the rear panel of the receiver and synchronize the fixed 1 pps to the external 1 pps by entering 0, then push the 1 pps SLEW function button. This function button is normally used to move the slewable 1 pps in time. However, to do a time synchronization these two pulses must be synchronized. The output of the 1 pps SLEW function is the measured time interval between the occurrence of the receiver slewable and fixed pulses. When the time interval is positive, the fixed 1 pps occurs before the slewable 1 pps. If it is negative, the fixed 1 pps occurs after the slewable 1 pps. If the time interval is increased in either the positive or the negative direction, the sign of the time interval will change when the interval exceeds 0.5 s and the absolute value of the measurement will approach zero (with the new sign). This method of operation was chosen for two reasons.
If an external 1 pps is not available or cannot be adjusted to the required frequency, the slewable 1 pps in the Model 2100 can be used to do the TOC synchronization. Using the 1 pps SLEW function. in the receiver, move the slewable 1 pps in time until it is set as described in section 3.6.2. Using a short piece of coaxial cable, connect the slewable 1 pps output on the rear panel of the receiver to the EXT 1 pps input. Synchronize the fixed 1 pps to the external 1 pps by entering 0, then push 1 pps SLEW. Leave the external 1 pps connected until the TOC synchronization is complete. After connecting the coarsely on-time external 1 pps to the receiver, satisfy requirement c by setting the internal 24-hour clock to UTC. To set the clock, enter a time which is several seconds in the future. When the time entered is reached and before the next second, push the UTC function button. Verify that the internal clock agrees with the correct time. To do a TOC synchronization properly, a valid time-of-coincidence for the date of the synchronization must be entered (requirement d). This gives the receiver a starting point for calculating a TOC time in the future of current time. To determine the first TOC of the day, locate the date of the synchronization for the GRI being used in the United States Naval Observatory Time Service Publication, Series 9 (refer to appendix). Enter the first TOC for that date and push FIRST TOC.
3.6.2. TOC Synchronization.After the four requirements are satisfied, the Model 2100 is ready to do a TOC synchronization. There is, however, one additional entry which the operator may wish to make. If a non-zero entry for TOC ADJUST is made before a TOC synchronization, the Model 2100 will automatically slew the sIewable 1 pps by the amount entered after the 1 pps has been synchronized to the loran C at a time-of-coincidence. Normally, this number will be negative, so that after the 1 pps is slewed, it will occur earlier in time than the fixed 1 pps by the total timing delay determined in this section. If the synchronization is done correctly, the result will be a 1 pps output that is coincident with UTC with an error equal to the error of the total timing delay calculation. When the receiver's fixed 1 pps and slewable 1 pps are synchronized to the external 1 pps (0, 1 PPS SLEW), the time difference between these pulses (as displayed by 1 PPS SLEW) will be approximately 0.6 µs. The reason for this is the difference in electronic paths within the receiver. For this reason, TOC ADJUST should be entered as the total timing delay plus the difference between the slewable 1 pps and the fixed 1 pps.
To start the TOC synchronization process, enter 1, then push BEGIN TOC. The TOC LED begins to alternate between red and green and the numeric display shows the next TOC time (output of BEGIN TOC function button). At one second before the TOC time the receiver will respond in one of three ways.
During the two or three seconds after the initial synchronization, the slewable 1 pps is moved in time by the amount entered through TOC ADJUST. Push 1 PPS SLEW to display the time interval between the internal slewable 1 pps and fixed 1 pps and verify that it is the same as TOC ADJUST, less the initial internal 1 pps difference. To determine the time interval between the external 1 pps and the fixed 1 pps, push TRACK DATA, 9. After a short delay, the time interval displayed will be positive, no sign, if the fixed 1 pps occurs ahead, early, of the external 1 pps and negative, minus sign displayed, if the fixed 1 pps occurs after the external 1 pps, later.
The interval between these two pulses will be equal to the total timing delay if the external 1 pps is synchronized to UTC. If the slewable 1 pps is used for the synchronization, the time difference will be the same as the 1 PPS SLEW measurement, because the two pulses used are the same in both measurements, and because the slewable 1 pps is also synchronized to the loran C at a time of coincidence. After a successful time synchronization, the Model 2100 keeps track of subsequent times-of-coincidence, comparing the time-of-day when a hardware coincidence occurs to the calculated next time-of-coincidence. At one second before a time-of-coincidence, the TOC LED turns red. One second later, at a time-of-coincidence, the LED turns green. As long as this LED is green, the receiver is still synchronized to UTC. If a hardware time-of-coincidence occurs at the wrong time, or if there is no hardware coincidence at the next time-of-coincidence, the TOC LED turns red, indicating an error. It remains red until TOC is canceled or restarted. Because of the various corrections that must be applied to do very accurate loran C timing, many users may wish to obtain a clock visit. That is, a portable clock, usually derived from an atomic standard, is brought to the users site. Using the UTC synchronized 1 pps from the clock, a TOC synchronization is done and the total timing delay, which includes all the delays discussed in this section, is determined. The delay, the GRI and name of the loran C station being tracked, and the date should be recorded. If time permits, two or more acquisitions and time synchronization should be done to verify that the receiver is consistently picking the correct cycle. In addition, it is highly recommended that this same information be determined for all loran C stations that can be received. These other stations can then serve as backups if the primary station is off the air for an extended period of time. If more than one receiver is located at a site, this data should be collected for those receivers too. In other words, a clock visit is usually very expensive and should be used to the user's greatest advantage. 3.7. CYCLE DETERMINATIONAccurate time synchronization has not been accomplished when the receiver's internal 1 pps has been synchronized to loran C. The 1 pps obtained from the TOC synchronization is very precise since it is derived from the phase corrected 1 MHz which is locked to loran C. However, it is not very accurate since the various delays have not been removed. One delay which needs to be know accurately, to synchronize the local time to within 10 µs of UTC, is that delay caused by the receiver tracking the third cycle of the 100 kHz carrier rather than the beginning of the pulse. The tracking point is a compromise between the no signal, time synchronized start of the pulse, and the seventh or eighth cycle, where the SNR is much better, but where skywave interference is most likely to occur. It does not matter which cycle is being tracked as long as the operator knows which cycle it is and what SNR and skywave problems may be encountered. When the Model 2100 enters the TRACKING Mode, it has decided that it is tracking at the end of the third cycle, which means a 30 µs correction must be applied. If the station is within 1000 statue miles, the receiver cycle determination is very good. Beyond 1200 statute miles (ground wave signal) there may be a +/- 1 cycle variation in the cycle picked as the third cycle due to the distortion of the loran C envelope. The cycle number calculated by the receiver and displayed by TRACK DATA 5 can vary from 2.0 to 4.0 and still indicate the receiver is on the third cycle. Before the receiver enters the TRACKING Mode, it settles on a zero crossing where the calculated cycle number is 2.50 to 3.50. This allows for significant distortion of the envelope. After entering the TRACKING Mode, the cycle number is allowed to vary by +/- 0.5, thus giving the possible range of 2.0 to 4.0. However, the cycle number will rarely exceed the 2.5 to 3.5 limits. If the cycle being tracked is in doubt, there are two methods which may be used to determine the correct cycle. The first method is to do a TOC synchronization, account for all the delays, then compare the resulting 1 pps with an external 1 pps which is know to be accurate to within 5.0 µs. This will usually be good enough to determine the cycle being tracked. The second method is to cause the Model 2100 to scan the pulse, producing a filtered representation which can be recorded on a linear chart recorder and analyzed by the operator. The procedure is described in the following paragraphs. Before doing a scan, the receiver should have been in the TRACKING Mode for at least fifteen minutes. Connect a linear chart recorder to the SCAN STROBE output on the rear panel of the receiver and adjust the recorder zero to the center of the chart with the recorder range set for 10 volts full scale. To start the scan, enter a number from 1 to 6, then push SCAN STROBE. The number entered determines the scan rate, with 1 the fastest rate and 6 the slowest rate. The fastest scan takes about two minutes and should give a good scan for noise numbers up to about 25. The scan time should be lengthened for higher noise numbers. The longest scan takes about 1.5 hours and should be used only when the noise number is higher than about 750. The chart recorder speed should be adjusted to give a separation between positive peaks of approximately 1/4 of an inch. The following chart shows the number of GRIs sampled during the scan and the length of time required to complete the scan for each of the rates using a GRI of 100,000 µs. All existing loran C rates will require less time for a scan.
When the scan is started the SCAN STROBE output on the numeric display shows the current location of the scan with respect to the third cycle tracking point, beginning at -50 µs and ending at +50 µs. When the scan reaches the tracking point, the linear output is set to zero. It remains zero for 2 µs of scan, then continues with the normal output. This zero period identifies the tracking point on the recording. At the end of the scan the receiver returns to normal tracking, which was suspended during the scan. The method for determining the end of the third cycle requires that the front of the pulse be located first. Using a pencil and ruler, draw two straight lines on the chart record, connecting the first 4 or 5 peaks (one line through the positive peaks and one through the negative peaks). The zero-crossing of the 100 kHz carrier nearest the intersection of the lines is the beginning of the first cycle. Alignment of the envelope with the carrier will not always be exact: the intersection of the envelope lines may not always occur exactly on the extrapolated zero-crossing of the carrier. Incorrect alignment of carrier cycles and envelope at the transmitter or dispersion in the propagation medium may account for the apparent misalignment. However, these effects cannot normally account for more than one-half cycle error, so that positive third cycle identification may still be accomplished easily. After locating the start of the pulse, count back on the pulse three full cycles of the 100 kHz carrier to locate the end of the third cycle. since the Model 2100 tracks the carrier at a positive-going zero crossing, the difference between the receiver tracking point and the third cycle determined above should be a multiple of full cycles of the carrier. If not, the beginning of the pulse was not correctly determined. When the correct cycle is located, count the number of cycles between the correct cycle and the receiver tracking point. If the correct cycle is to the left (earlier in time) of the receiver tracking point, enter the number of cycles to be moved (6 maximum) , push the +/- key, then TRACK DATA 5. If the correct. cycle is to the right (later in time) of the receiver tracking point, enter the number of cycles to be moved (6 maximum), then push TRACK DATA 5. After the tracking point is changed, the receiver will not allow an additional shift for a period of time determined by the average noise number at the time of the shift and the GRI. During this delay, the new nominal cycle number and gain are determined, which will be used to determine cycle errors and loss of signal. The following table shows the amount of delay for a GRI of 100,000 µs and various noise numbers.
An alternate method for locating the end of the third cycle involves counting half cycles of the carrier wave. This method is quite useful in high noise conditions where it can be difficult to locate the front of the pulse. However, its usefulness may be greatly limited when skywave is present. After obtaining the pulse scan, locate the largest amplitude, positive half cycle of the carrier. This should be the seventh positive peak. Starting at the seventh peak, count backwards to the fourth peak. The zero crossing in front of this peak (peak at 32.5 µs) is the end of the third cycle. When the correct cycle is determined, move the receiver tracking point as described earlier. 3.8. FREQUENCY MEASUREMENTAnother benefit of the high stability of the loran C groundwave and the use of cesium standards for transmissions is the ability to make very accurate frequency comparisons. While a stationary receiver is tracking a loran C signal, the change in the receiver's tracking hardware to keep it on the zero crossing of the 100 kHz carrier is directly proportional to the frequency difference between the transmitter's cesium standard and the local reference being used by the receiver. If the change in the receiver's tracking point (Δt) for a specific period of time (T) is known, it can be shown that,
|